Rust Get Started
Rust Get Started – Complete Beginner Setup Guide
So you’ve decided to learn Rust — great choice!
Rust is fast, safe, and modern. But before writing powerful programs, you need to set up your environment properly.
This fully beginner guide will walk you through:
Installing Rust (Windows, macOS, Linux)
Understanding rustup, rustc, and Cargo
Creating your first Rust project
Project structure explained
Running and building programs
Using VS Code with Rust
Common beginner mistakes
Next steps in your Rust journey
Let’s get started
This section will help you Rust Get Started from zero — installation, first program, and running it step by step.
Step 1: Install Rust Using rustup
The official way to install Rust is through rustup — Rust’s installer and version manager.
It installs:
rustc(Rust compiler)cargo(package manager)rustfmt(formatter)Standard library
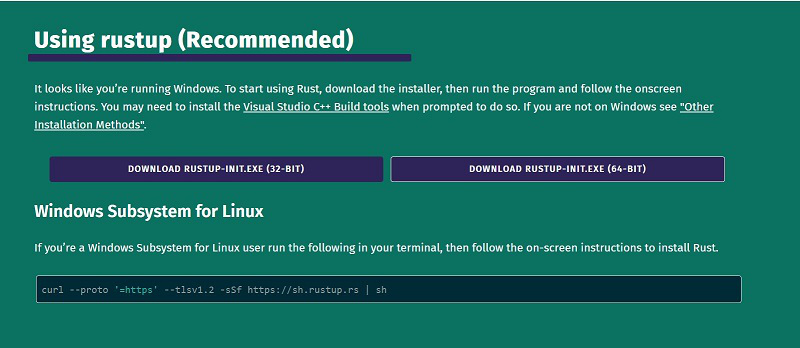
Install Rust on Windows
Go to:
Download the Windows installer.
Run the
.exefile.Follow default installation steps.
After installation, open Command Prompt and check:
If installed correctly, you’ll see something like:
Install Rust on macOS or Linux
Open Terminal and run:
Follow the on-screen instructions.
After installation:
rustc –version
Understanding Rust Tools
Once installed, you have:
| Tool | Purpose |
|---|---|
rustc | Compiles Rust code |
cargo | Manages projects |
rustup | Manages Rust versions |
Cargo is the most important tool for beginners.
Step 2: Create Your First Rust Project
Instead of writing standalone files, Rust uses Cargo projects.
Create a new project:
Go inside project folder:
Run it:
You’ll see:
Congratulations You just ran your first Rust project.
Project Structure Explained
After running cargo new, you’ll see:
├── Cargo.toml
└── src/
└── main.rs
What Is Cargo.toml?
Cargo.toml contains:
Project name
Version
Dependencies
Example:
name = “hello_rust”
version = “0.1.0”
edition = “2021”
What Is main.rs?
main.rs contains:
1 2 3 | fn main() { println!("Hello, world!"); } |
main() is the entry point of the program.
Step 3: Compile and Run Rust Code
Build Without Running
Run Program
Compiles and runs in one command.
Release Build (Optimized)
Used for production.
Writing Your First Custom Program
Edit src/main.rs:
1 2 3 4 | fn main() { let name = "Rust"; println!("Welcome to {} programming!", name); } |
Run:
Output:
Using Variables in Rust
Rust is strongly typed:
1 2 | let age: i32 = 25; let is_active: bool = true; |
Rust infers types automatically:
1 | let number = 10; |
Step 4: Set Up VS Code for Rust
Install VS Code
Install Rust Analyzer extension
Open your project folder
Rust Analyzer provides:
Autocomplete
Error highlighting
Code navigation
Smart suggestions
Useful Cargo Commands
| Command | Purpose |
|---|---|
cargo build | Compile project |
cargo run | Build + Run |
cargo check | Check errors without building |
cargo clean | Remove build files |
How Rust Programs Work
Execution starts from
main()Rust is compiled, not interpreted
Errors are caught at compile time
No garbage collector — memory handled safely by Rust
Write code
cargo buildFix compiler errors
Run program
Updating Rust
To update Rust:
Check installed toolchains:
Running a Single File Without Cargo
You can compile manually:
./main
But for real projects, use Cargo.
Adding Dependencies
Edit Cargo.toml:
rand = “0.8”
Then run:
Cargo automatically downloads dependency.
Understanding Rust Compilation Errors
Rust compiler is strict.
Example error:
This means:
You violated ownership rules
Borrow checker caught it
Rust errors help you write safer code.
Common Beginner Mistakes
- Trying to skip Cargo
- Editing files outside
src/ Forgetting to runcargo buildNot understanding ownership errors- Using outdated Rust version
Recommended Beginner Practice
After setup:
Practice variables
Learn ownership
Study functions
Explore loops
Try small CLI tools
Build simple projects like:
Calculator
Guessing game
To-do list
Rust Documentation
Official Rust Book:
Why Rust Setup Feels Different
Unlike scripting languages:
Rust compiles first
No immediate execution
Strong type system
Strict ownership rules
But this ensures:
- Safe code
- Fewer runtime crashes
- High performance
Frequently Asked Questions (FAQs)
1. How do I install Rust?
Use rustup from https://rustup.rs and follow installation steps.
2. What is Cargo in Rust?
Cargo is Rust’s package manager and build system.
3. How do I run a Rust program?
Use cargo run inside project folder.
4. Do I need an IDE for Rust?
No, but VS Code with Rust Analyzer is recommended.
5. How do I update Rust?
Run rustup update.
Conclusion
You now know how to:
Install Rust
Use Cargo
Create projects
Run programs
Add dependencies
Set up VS Code
You’re officially ready to start learning Rust programming.
Rust may feel strict at first — but that strictness builds strong programming skills.
